Wednesday, January 3, 2024

More works in progress - you win some - you lose some

 Nothing too much to say about this - except that it was a fun thing to do - I broke from my recent Dala Ink obsession and went back to good old Tim Holtz Distress ink to ink the elements.  My favourite part was inking a brown bag in 'evergreen bough'/'moss-something-or-the-other' and then fussy-cutting curling it up to make the seaweed.

 
This next one below is an idea that I am kicking around with.  I dont particularly love it enough yet to give it's own post - but it is still fun to keep messing with it  to see where it goes.


Lastly - this is one that I am not fond of at all.  I am discovering that my attempts at a vintage style - might not be my thing AT ALL .  So like here in this one below I feel like I don't get the elements and/or the layout right and it just looks like a bunch of things got stuck together with a stray piece of chewed up bubblegum on some dirty ol' rubbish bin.  And maybe I need to wash my blender brushes because all my inking looks a little dirty. And quite clearly this is a choice of palette that does not work together - but hey - you live you learn. What's that thing they say - "Creativity is about making mistakes, art is knowing which ones to keep" or something like that?

This one is NOT the one to keep
πŸ˜›


Experiments with packaging

 I have to admit that I drive my family nuts with my collections of junk, old packaging and just generally anything I think might make a nice bit of texture or craft experiment.  There is a point to it though - you can discover some awesome texture stamps and I feel better about re-using things that would normally just end up in the rubbish dump.  So I always feel better about reducing waste and doing a tiny bit for the future of the planet and having some experimental fun in the process - win-win. 

Anyway, this project below is one of those:

Are you able to pick out the salvaged elements?

There is a piece of corrugated cardboard that came from a box that I painted with Dala Tempera in Magenta.

😜😜😜😜😜😜😜I stamped the background border texture from a piece of shock-protection sponge that is used in electronic goods packaging - it really makes a lovely printed mottled, bubbly texture - this would be awesome to mess around with on a gel plate I reckon.

The actual background card was the cardboard insert, that they stretch pantyhose over (dudes I am not even kidding here - I will save everything). On that note, the insides of the little boxes that the Tempeest loadshedding light bulbs come in make the best material to use in a die-cutting machine - it is stiff but soft enough to cut through and very, very easy to use with dye ink if you would like to add some colour.

The little string elements came off gift tags on this year's christmas presents. The white mesh was from a roll of mosaic tile tape😁. The black grid and the buttons are about the only things that I can say that came from actual dedicated craft store supplies.....though I bought those buttons in a fabric store with the intention to make a tiny button necklace.

The sentiment element was the inside piece of a frame die that I used on another project.

And I stamped and coloured with Dala drawing ink that I soaked into those flat latex make-up sponges.  You've got to keep these latex sponges constantly wet and in a teeny airtight 'tupperware' type container if you want to make these re-usable as the ink does eventutally dry out to a hard matt glaze type finish if you do not. But I mean its not too bad if it does, you can crumble this up, I have once  before chucked the broken bits in an old coffee grinder that I use for crafting to make colourful crumbly bits for other projects.  I mean I dont know what I might actually use this weird textured thing for - but hey it is what it is and when the time comes it's use will reveal itself to me....tee hee....😜😜


Tuesday, December 19, 2023

A never-ending story - a beautiful journey with Dala

 
I know that I have mentioned my love of Dala supplies in the past. This is another Dala gushy post featuring their puff paint.  Guys, I am giving you the permission to steal this supply from your kids stash - it is so fun to mess with.

 A while back the framing shop SERENDIPITY (a Framing shop with some art and craft supplies) had a tiny bottle of Dala Puff paint in the kids craft section, so I got it - and then I forgot about it.  I just recently re-dicovered it.  Anyway the lid on this thing had split open at the top for some reason so the paint had started to dry out a bit but I discovered that this makes it work a little better than when it is fresh off the cart.  The slightly dried out, more viscous consistency of the paint - makes it easier to control on paper and you can scrape it into lines, run it over a stencil as a paste, it dries a little quicker as well, so you can mess about with puffing bit a little faster (which is always a plus when you are as impatient as myself).  

Puff Paint comes in the regular Dala brand colours and so while you can get it pre-coloured I like the white puff paint because you can paint or dye it whatever colour want and you can control to a fair degree where you want to colour the puff. Plus - it's all about the texture - this is the most grown-up kind of puff paint if you are into texture but want to move beyond the marshmallow puff kind of puffing paint.  With a heat gun you can puff this baby up straight away, or you can wait and let it dry naturally on the paper.  Depending on how you heat it and how thin or thick you strokes of paint are you can create tiny puff plumes or big billowy plumes of  puff.  I laid on the puff paint in dense gloopy globs and blasted it with a heat gun here to create the the whimsical "lavender" stalks .  While for the background texture - I kind scraped it on with a spatula tool and then created lines by dragging vertical stripes through with a disposable knife.  I also let this dry out a bit longer before I blasted with a hot hairdryer instead of a heat gun.  

The colouring was done with the Dala kids 12 block paint set that I mixed in a palette with drops of watered down Dala Dawing inks. I used Magenta, Turquoise, Yellow, Blue, Viridian and Green - but I blended them in various shades to my preference.  This works surprisingly well and you can get the best spectrum with just a combination of inks and kids powder watercolour paint.  

On another side-note while we are talking about raiding your kids art supplies - another brilliant product from DALA to paint with is the kids liquid TEMPERA - the colours are so richly pigmented and lightfast, and it has a lovely almost liquid gel like feel to it, so it doesn't scrape on the paper and shred it, it also seems to make the paper less warpy than regular watery kids paint. While I am quite excited to share my Tempera experiments and will post on it in the future - I didn't use Tempera on this tiny project though.

The background stamping was done in Dala Black, Blue and Red Stamp Pad Ink that I mixed together and then watered down a little with glycerine, to give it a little smudgy sort of faded out effect, I liked that it kinda makes it look like badly printed fabric.  I poured this mixture into an empty stamp pad and stamped the background with that.  I find that just playing around with Dala regular stamp pad ink blends gives you the most vintage effects. If you add the right amount of ink to their Acrylic Retarder and lay that down on squished up paper, let it dry and then iron it out flat - you can create some really cool looking vintage background paper.   You can really do so much with these products if you are willing to experiment - I truly love this company, the fact that all their products work seamlessly with each other and the freedom it gives you to mess about with your own creativity without breaking the bank.

The lasso frame behind the bark was made from dyeing white paper covered wire with watered down Dala Golden Brown Drawing Ink.  The paper wire may or may not have been from Dala - I have no idea where it comes from - I am willing to go there though and say it because most of the craft items I get are from Dala.  

Anyway - this is my Dala appreciation post for today.  I am not sponsored neither am I affiliated with them in any way, I just really appreciate their stuff because it is well priced for the quantity you get and the quality is pretty decent compared to buying from abroad. It's good to support local and they deserve the mentions because it is literally my 'go-to' brand and I love it.

My future mad scientist experiment with Dala lovables is going to use the acrylic glaze as a "clear drawing ink" - I want to make metallic drawing inks - I have purchased the Dala Pearlescent Powders and my idea is to blend the powder with the glaze to make metallic drawing ink.  I will keep you posted if it works out!


Saturday, August 19, 2023

a little bit of everything

6

 So I always save all kinds of bits and pieces of things that I save because I think they might come in handy one day to craft with.  The fun part for I have to admit is re-imagining (upcycle if you will) things you would ordinarily chuck out.  So I have boxes of salvaged things like popsicle sticks and bits of wire, used plastic zip ties and gold paint that I scraped up off mats.  I found a book of latin verse that was published in the early 60's and I collected that too. 

But what do you do with the random collections of junk before your house starts to look like a an episode of Hoarders?  Make cards - that's what you do, make adorable cards for your loved ones.

Popsicle sticks can be turned into a little fence with a black pen and some brown stain or ink.  I mixed Dala Sepia Drawing Ink with a bit of their Black drawing ink and watered it down to get a weathered effect.

Old cereal boxes can take a crafty beating - I put a layer of modpodge on it to glue down some book pages - inked over with Dala Drawing Ink.  I love Dala drawing ink for vibrant but translucent colour.  The ink must have some kind of glaze or polymer in it because it dries to a matte gloss finish.  It's really cool

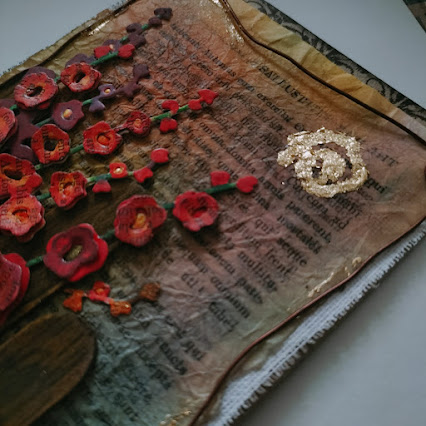
I then die cut the Hollyhocks out of the cereal boxes with the holly hock die. They went in front of the fence and that wrought iron strip was a piece of zip tie that got a treatment of super glue and fine beach sand that I dyed with Dala drawing ink.  I kinda did the same thing on the sentiment label plate thingie  bit with a rougher texture from big flake glitter that I had bought for my kid from Dala as well - over the top went some gold leaf size from Dala which I could swear is the same as Dala Stencil Glue which I have been obsessed with for years.  I let that dry out a bit to get super tacky.  The gold leaf flakes are actually the result of mixing Dala gold paint mixed with a bit gold edible mica (the kind you use in baking - think I originally got that from Barco moulds.  Anyhooooooo, I had painted something or the other and because I use those clear kitchen mats cutting boards as a palette - I had quite a bit of this beautiful dried gold paint - so I had the tincan head idea to scrape that off and collect them in a jar.  Like OH MY GUYS - it worked brilliantly as a knock-off diy of flake bits - seriously they work just as well as any other flake bits that you would buy.

Remember that old book of latin verse?  I have been wanting to try my version of the Japanese Mokugami paper. Mokugami is kind of like a rumpled texture paper.  I always loved how it adds a depth and texture to paper.  I thought a latin page would be cool to do this with. Anyway, I wanted a lighter pastel type of colour to this so instead of Dala, I went in with ink blending brushes.  I didnt even re-ink them - just went with the residue on the brush.  

I started squishing and squashing and then thought that I kinda wanted it to look more like waxed paper so then I got a solid body butter stick (for reals I am not even joking) - this butter stick smells so deliciously like citrus leaves. I swiped that all over the page, used my hairdryer to heat enough so that it saturates the paper. I then glued that down with Dala stencil glue onto an old offcut piece of canvas - this might have been out of one of Dala's painting pads  but I cant be sure - it was just a random piece that I found in those boxes of stuff that I save like a hoarder.  

I don't work for Dala by the way, even though this whole post is reading like an advert for them. I have to tell you about my most recent serendiptious moment with them - I had bought their liquid tempera for my 6 year old to paint with and guess what - I have stolen most of it from her supply.  I love it more than the regular craft acrylic I get from them - I think I love the tempera more - its like the perfect highly pigmented translucent paint that dries to an un-movable finish with insane pigmented translucency with a matte finish.  It is so light fast as well.  I dont think gets DALA gets enough credit in the crafting world for the kiff-ass stuff products that they make.  I am such a fan.

So that's this post.  I will keep posting my destashing attempts as I go along.  


Fun Cards - clouds and Hot air Balloons

 Do these ever really get less fun to do?  I have three different designs of hot air balloon. I am a little nuts about them. This is my favourite of the lot. 

 I enjoy making these so much that I kinda have to keep track in my head of who I sent Balloon cards to so that I do not continually send them the same type of card.  

This one is for a 7year old BFF of my daughter.  

The penant streamer was made from washi tape - after years of painfully cutting perfect tiny diamonds and then folding them over the cord, then trying to glue them together, I finally realised I can just fold washi tap over on itself and then cut them into triangles - DOH - why I didnt think of this earlier is directly correlate to my DOH-brain.  

I totally scratched out the personalised birthday sentiment out of a piece of rainbow themed scratch card. 

Wednesday, August 9, 2023

I have been saving my cards on Pinterest but here's one just to keep this blog running

Its for my dearest, it's his 50th birthday on Sunday coming.  

We have an almost 6 year old - she is lots of energy and he is such a trooper when it comes to keeping up with her - it's always full steam ahead.  So this little birthday card is a nod to the magnificent engine that he is - even at 50 and now going beyond.

I love you babes, you have changed my life in such and magnificent way on so many levels.  Thank you for sharing this part of your life with us. (I mean he's never going to read this blog ever because we have all forgotten about it - but hey..........)

I am also going to add to this - that I am going to enter this into the SIMON SAYS STAMP challenge - Monday Challenge - Happy Birthday ALL and create because:

1.  I happened to see that it was a challenge that perfectly and miraculously aligned with the making of this birthday card - 

2.  I always want to enter these challenges but hardly ever do - so today I am

3.  I had a look at the entries and decided that it needed something steampunk-ish and in richer colour palettes - just for variety sake

Thus I present MORE STEAM FOR MORE PUNKERY FOR 50 MORE - a birthday card for my darling man,


Tuesday, August 8, 2023

A few cards here and there

 There are a couple I have made over the last 6 years, I still like doing it - just never get the time to do it as much anymore, they still are fun nevertheless.  Mainly I post them to Pinterest.  I like Pinterest - so quick and easy and fast to share to.  I have ghosted Blogger for Pinterest - its true.  I never quite got into Instagram, even though I have an account.  I just like Pinterest so much more - like its for grown-ups who dont really want to be grown ups but also wanna be grown-ups - strike that and replace with NEED TO BE GROWN-UPs.

You dont have to go through all this time consuming blog writing as well.   Anyway - here is a new card that I loved making - it was a birthday card - you just needed a set of stitched star nesting dies and "Bob's your stardust!"  Kinda loved giving it a slightly vintage retro tatty feel.  That was my favourite part.


Monday, August 7, 2023

I accidentally bought 24 sheets of the same 12'x12' design - PART 2

 As I was saying earlier in Part 1 - I have been hard at work trying to not bore myself with the paper. 


Fortunately it is such a wonderfully neutral design and colour palette that it lends itself well to many re-imaginings.  

In this re-imagining - I went totally out of my usual tendency to love and create in rich, deep jewel tones  and go with something a light, pastel and airy.  I must admit though that the 14 year old that I was creating this birthday card for heavily influenced the colour palette.

The hardest part of this card was trying to glue the wire lettering down - but I discovered a really neat wire gluing trick - ACRYLIC NAIL GLUE!!  It works so well - it is super quick drying and it comes with a little brush - so you don't have to squeeze big old drops of super glue or super glue gel onto everything and their aunty. You just brush the back of the wire with glue soaked brush and down she goes like an anchor off an ocean tanker.  

I will keep up this series as long as I can think of different ways to use the wood grain paper!


I accidentally bought 24 sheets of one design of 12 x 12 inch Scrapbook paper - Part 1


Consider this a continuing series of how I can "re-interpret" the  wooden design element on all 24 sheets of 12x12" the paper in as many ways possible.
 
So how did I love thee - let me recount the ways - One way was to super like making this birthday card for my darling friend Lesley, who is the sweetest, funnest, coolest, and I really wanted to do something that would be loved by her. 
 
I challenged myself to use stamps and dies from older collections from years past.  Lately I have been pulling out more Tim Holtz of yesteryear and really "enjoying the journey" with that.

I used a free vintage font 'Essays 1743'  to make the print on the scrolls.  The map texture was also a free map jpg that I got from somewhere a long time ago and I happened to have unused printer sheets of that.

One thing I really love is stamping with TIM HOLTZ Inks and then overstamping in the same Oxide  of that. It looks soooo vintage grungey. The stamping platform makes that so ridiculously easy to do.  I have one of the TIM HOLTZ stamping platforms from when they were originally released.  I was gutted when they were made to take that off the market - I love the platform and I wanted a bigger one and now I cant get one.  As for the MISTI - I just cant justify (especially with South African exchange rate) the huge cost or pricepoint of it and that is excluding how much it would cost to pay import and shipping from the US or Canada.  The price of the small size version, seriously, not even the big version of that is enough to feed six families here. I get that its willing buyer/willing seller and yes, yes, the mighty dollar signs call them but me  - consider me an unwilling buyer - me must rather eat. 

This card was inspired by the ADVENTURE AWAITS card designed by Kath Stewart on an old 2018 Monday Challenge of Simon Says Stamp that I happened to find randomly on Pinterest.  I pinned it to my board Awesome Cards on Pinterest.  You can check that board out here -   https://za.pinterest.com/tincanac/awesome-cards/.  You can link to the card directly here Kath Stewart's original masterpiece

I loved it so much that I wanted to do something similar but with my spin on it.  I dont know what I would call my style - eclectic is as kind as I can be in describing it - its not really here or there or anywhere in particular.  Either way - here it is here - A BIRTHDAY CARD.  Gotta love birthdays - such wonderful reasons to make things.

Friday, June 25, 2021

3 Tiny Squirrels go on a nutty adventure


 I love these tiny squirrels.  Initially I thought they are so small what can you possibly do with them?  But the ideas have been churning and this layered A5 sized card was inspired by my little girl, who told quite a lovely story as 4 year old's are prone to do about a squirrel girl who had squirrel friends. One day the little girl got lost in the forest, but she was okay because the squirrels helped her collect all the nuts they could find.  So she was not hungry and she had her friends and she decided to live there happily ever after. The End. 

So there you go - that was the inspiration behind the card featuring the 3 TINY SQUIRREL Die-set.

Yes, we can be nuts together.